This article shows you how to set up a simple UI in your game which allows the player to customize the keybindings using the Enhanced Input System. We will set up a UI which automatically gets the list of all available player mappable keys, and displays them in a list where the player can configure the bindings.
This article assumes you have set up your input actions and player mappable keys. If you haven’t, see How to configure player mappable keys for Enhanced Input. This article is also does not go into details on how to set up enhanced input in your pawn/character - for that see Basic Enhanced Input setup
Overview
We need to perform the following steps in order to make the keybinding system work:
- Make sure the appropriate input mapping contexts are registered with the Enhanced Input System User Settings object
- Create some UMG widgets to display the user interface
- Add some logic to remap and save the keys based on user input
1. Registering input mapping contexts
As step one, we need to register the Input Mapping Contexts with EnhancedInputUserSettings class. This is required for the settings system to be aware of the player mappable keys we have configured. If we haven’t registered the mappings, it’s as if the keys don’t exist.
Registering the mapping contexts also automatically handles loading and configuring any existing keybinding settings.
There are two ways to register the mapping contexts:
-
Get the user settings class, and directly register the mapping context with it. This tells the user settings class which player mappable keys exist, and makes the system load them and make them available for remapping.
-
The second option is to register the input mapping contexts with the local player subsystem. This is what you would normally do in your gameplay code, such as your controller or character, when you want to enable inputs. In addition to enabling the inputs, this also registers the mapping context with the user settings.
So which option should we use?
If we’re building a UI to simply display and configure the inputs, we should register the contexts directly with user settings. If we registered them with the local player subsystem, it would also enable those input actions, which could cause problems because we’re in a menu.
In our gameplay code, we should still register the contexts using the local player subsystem as normal.
We’ll make sure to do the appropriate registration in the next steps, as we build the UI widgets.
2. Creating the UI widgets
We’ll create two widgets for this demo:
- A widget to display an individual player mappable key with its name and current mapping
- A widget which displays the list of mappable keys, and manages the display and saving
Creating a widget to display an individual player mappable key
Start by adding a new Widget Blueprint into your project. I’m going to call mine W_InputActionRow
Mine looks like this:

This is a Horizontal Box, which contains a Text Block on the left, and an Input Key Selector on the right. Both of them should have Is Variable enabled so that we can access them from the widget graph.
In the graph view, we need to create one variable: KeyMappings with the following settings:
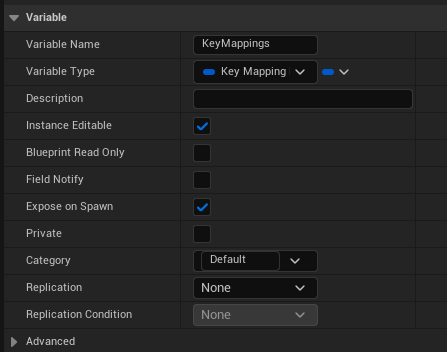
Note: Variable Type should be Key Mapping Row.
We will use this variable to pass in the key mapping information that this widget will display.
We also need to set up one event dispatcher:
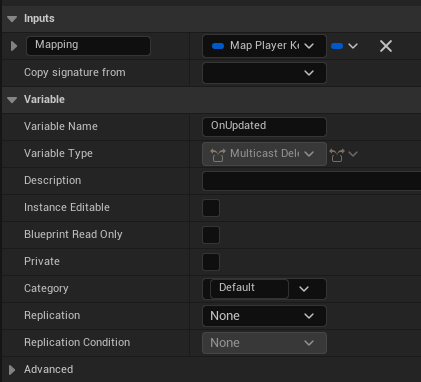
The variable type for Mapping is Map Player Key Args. This dispatcher will be used to notify the settings user interface when the player updates the key binding displayed here.
Next, we’ll set up the Construct event for the widget graph:
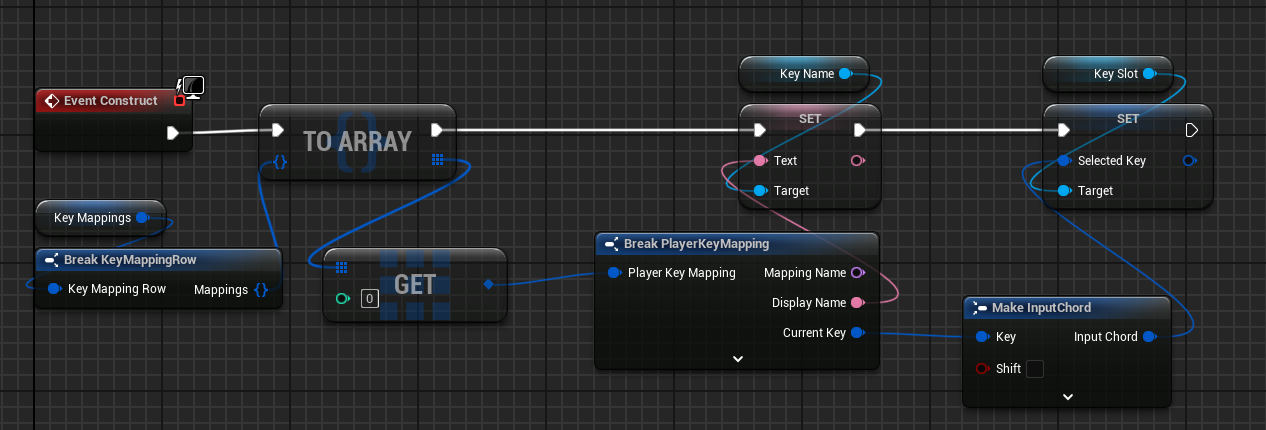 This graph takes the value from the Key Mapping Row variable, and uses it to populate the default values shown in the widget.
The Key Mapping Row contains a list of Player Key Mapping structs. There can be more than one of these - for example, you can have primary and secondary (or more) bindings for each action, or different device IDs. In a more complex system you would iterate the array, but for this simple example we can assume there’s always just one value in the list.
We also need to handle the On Key Selected event for the Input Key Selector element. You can create this event node by clicking the Input Key Selector element in the Designer view, and finding the On Key Selected event in the Events category in the Details panel.
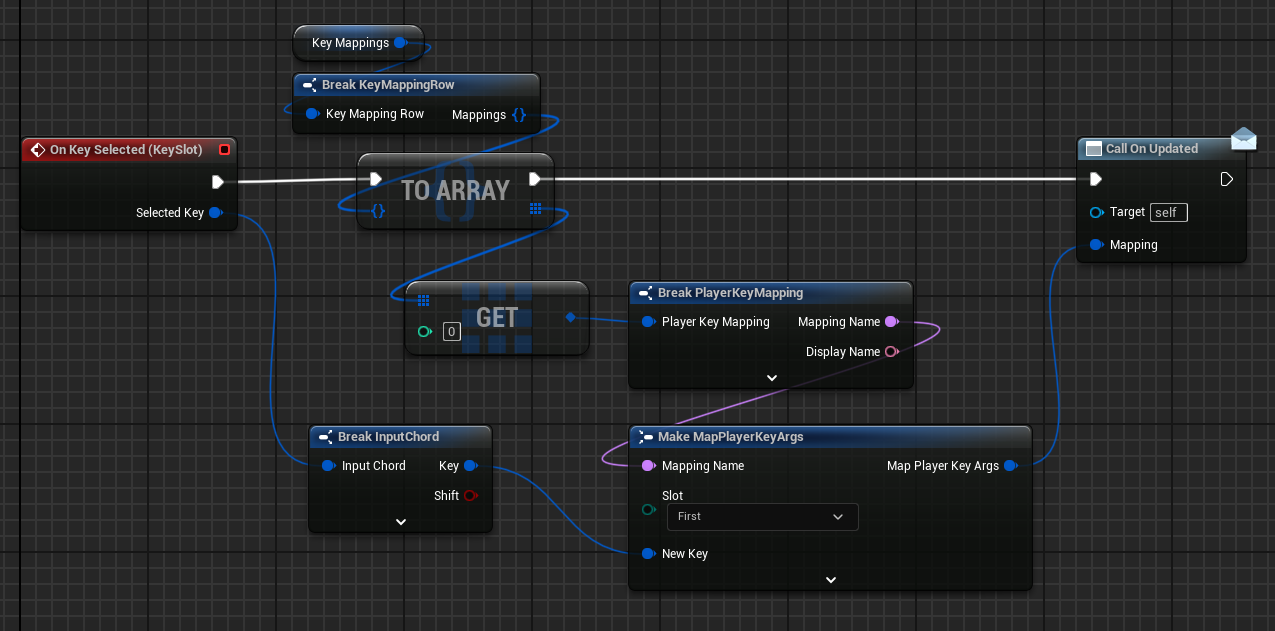
Here we create a new Map Player Key Args struct based on the key mapping data we have, and the key the user selected. This is then used to call the On Updated event dispatcher.
As before, we assume the Key Mapping Row data contains only one item and use it directly. In a more complex setup with multiple bindings and such, you may need to perform more complex logic.
Note regarding slots
Transclude of block
Creating a widget to display and manage the mappable key list
I’m going to call this widget W_InputView. To keep things simple, I’ll only add a Vertical Box into it. This should be marked as Is Variable, because we’ll be using this in the graph.
Let’s create the Construct event graph first:
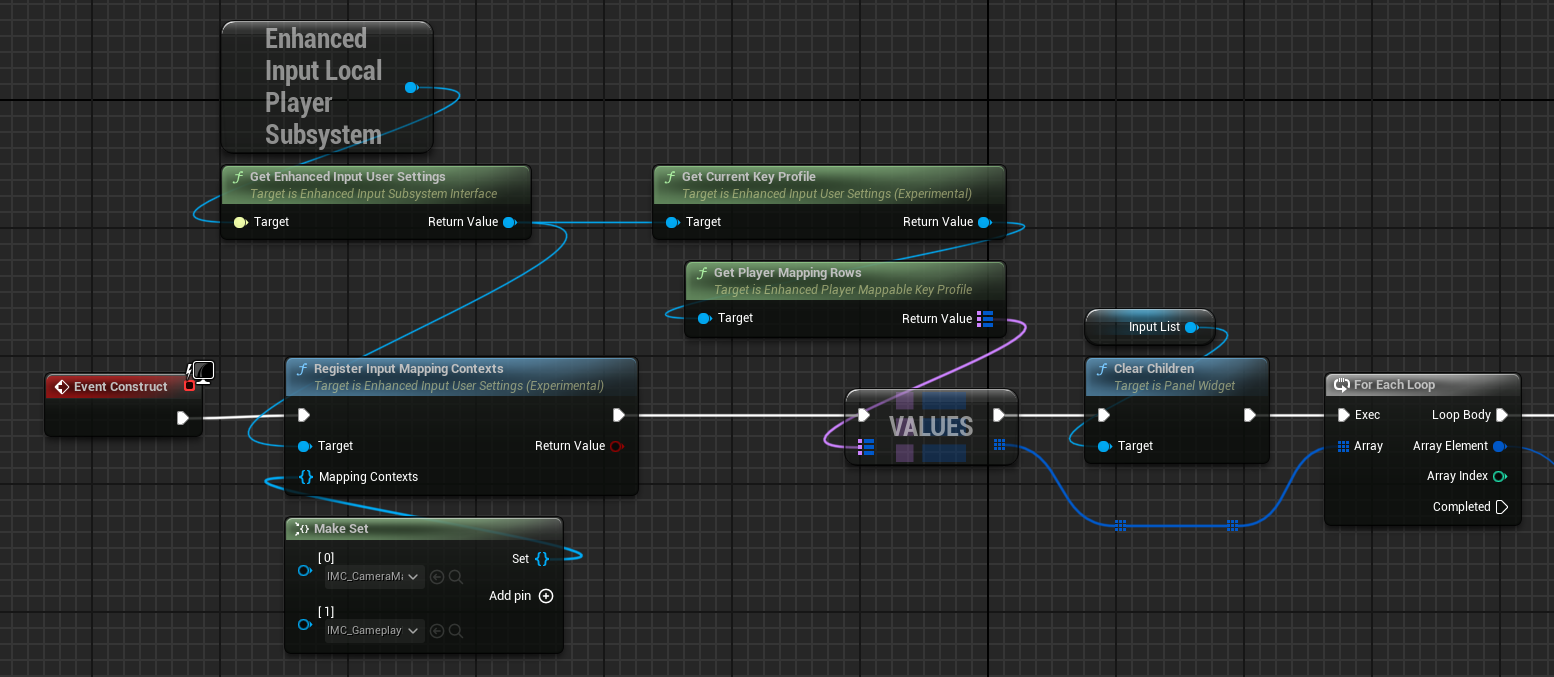
 The first thing to note is the Register Input Mapping Contexts node. As mentioned in Step 1, we need to take care to register the input mapping contexts for our game with the user settings, or otherwise the player mappable keys won’t be available. If your game only uses one input mapping context with mappable keys, you can use the Register Input Mapping Context node instead, or just pass in a Set with only one item.
After registering the mapping contexts, we read the current key profile from the settings, and read the player mapping rows from the profile. This contains the actual info on the player mapped keys.
We then use this information to create the W_InputActionRow widgets to display the list of mappable keys. Note that we bind an event to the On Updated dispatcher for each of the row widgets, which calls a Custom Event Update Mapping.
The Update Mapping custom event looks like this:
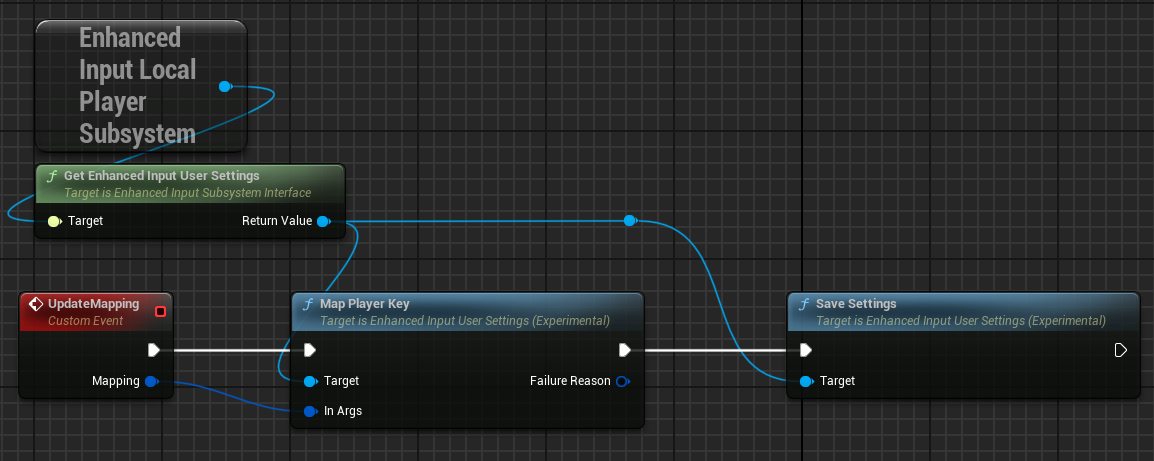
The type of the Mapping parameter on the event is Map Player Key Args. The graph itself should be quite self explanatory - we simply pass the Map Player Key Args struct into Map Player Key which updates the user settings, and then use the Save Settings node to actually save the settings.
In a more complex situation we might want to wait before we save - for example, if we want to allow the user to cancel their changes. However, for this simple example saving it immediately works fine.
3. Adding logic to handle remapping the keys
Actually I tricked you. We did this already in the previous step. Oops.
Finishing up
With this we have everything we need to allow the player to update the inputs to their preference.
All we need to do now is to add the W_InputView widget into an existing settings UI, or display it on the screen by using Add To Viewport or other such method.
The resulting widget should look something like this

If the user clicks on the Input Key Selector, they can remap the key to something else and it “just works”.
This can be easily expanded from here to build a more complete input screen. For example, you can use the Category option, and group and sort the displayed input list by their category. You could also add a second keybind option, so that the user can optionally bind more than one key per action. This can be done by using the Slot option in the Map Player Key Args struct and others.