This article covers some examples of how to allow multiple different kinds of behaviors from a single Smart Object, ranging from quick workarounds to a more intricate advanced usecase example.
Overview
At least as of Unreal Engine 5.4.2, the Smart Objects system doesn’t support slots with multiple activity types out of the box.
To give an example, say you have a button panel actor which supports two activity types - Check Status and Press Button. How can you allow your AI NPC’s to do both of these activites from the button panel smart object?
Although Unreal allows you to add multiple behavior definitions into a smart object, there’s a large gotcha involved: Only the first definition of a specific type is ever going to be used. If you want your AI to run a different Gameplay Behavior for each of your activity types, you need to find a workaround.
Supporting multiple behaviors from a smart object
First, let’s take a quick look at some simple workarounds that will allow you to add multiple behaviors into a smart object. After this I’ll show you a more customizable and robust solution.
The simple workarounds are:
- Add multiple smart object components into the actor. This way you can create two Smart Object Definitions, one which supports the
Check Statusactivity, and another which supports thePress Buttonactivity. - Add a single smart object component with one smart object definition, but create duplicate slots. You can create two slots in exactly the same position, but give each slot its own activity tag and its own behavior definitions.
Both of these approaches will allow you to support two (or more) activities per a single smart object actor.
There is one big downside to both of these: There’s an extra unclaimed slot in both cases. This means if one actor is using the slot for one action, the second slot for the other action is still available for another actor to claim - which could be problematic depending on how your game works.
How to support multiple behaviors from a single slot
There are two ways a single slot can support multiple behaviors, which doesn’t have the downside listed above:
- The UGameplayBehavior itself can implement two (or more) behaviors
- A custom Gameplay Behavior Definition can be used along with a custom AITask to support an arbitrary number of behaviors
While approach 1 can be simple, it has a disadvantage in that you’re defining multiple behaviors in one. This limits your ability to reuse the gameplay behaviors individually. It also has the problem that the gameplay behavior must somehow be able to determine which of the sub-behaviors it needs to execute, which can be complicated as you can’t easily pass parameters into it.
As such, the second choice is more robust. It requires a slightly more complex setup, but the way it works is much more flexible.
Creating a custom Gameplay Behavior Definition with multiple behaviors
The first component of this solution is a custom Gameplay Behavior Definition which allows us to support multiple Gameplay Behaviors, and select the appropriate one using a Gameplay Tag
UCLASS(NotBlueprintable, DisplayName="Tag Behavior Smart Object Behavior Definition")
class MY_API UTagBehaviorSmartObjectBehaviorDefinition : public USmartObjectBehaviorDefinition
{
GENERATED_BODY()
public:
UPROPERTY(EditDefaultsOnly, Category=SmartObject, Instanced)
TMap<FGameplayTag, class UGameplayBehaviorConfig*> GameplayBehaviorConfigs;
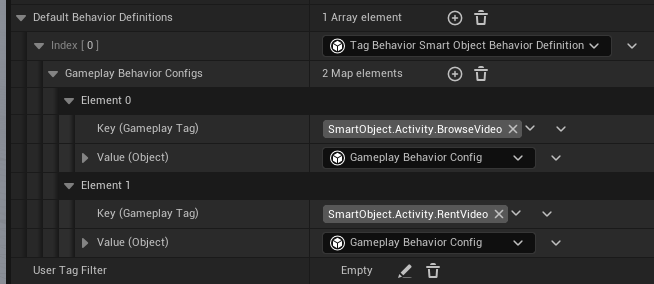
};When used in the Smart Object Editor, this allows us to define a gameplay tag to gameplay behavior mapping, which looks something like this:
Creating a custom Use Smart Object AITask
The default smart object -related AITasks don’t support this type of selection, so we need to create our own logic for executing this instead. We can mostly just copypaste the engine’s own implementation, and make a couple of small modifications to it.
It’s a fairly large amount of code so I’m not going to paste it here - you can just copy the code yourself from AITask_UseGameplayBehaviorSmartObject.h and .cpp. The modifications you would need to do are mainly within the StartInteraction() function - this is where it gets the gameplay behavior and triggers it.
The modifications are roughly like this:
- Add a gameplay tag as a property to the AITask
- Update the static construction function to take a gameplay tag as a parameter, and assigns it into the created task
- Within
StartInteraction, try casting the gameplay behavior definition into the customUTagBehaviorSmartObjectBehaviorDefinition - If the cast succeeds, use the tag to find the matching gameplay behavior from the map
- Otherwise follow the default logic for choosing the gameplay behavior
Conclusion
Once you have this set up, the system becomes quite easy to use. For example…
- First, you search for smart objects with the
Check Statusactivity tag - You use your custom AI Task with the
Check Statustag - The AI task picks the correct behavior from your configuration based on the tag
This makes it quite easy to extend with more behaviors if necessary, and you can extend your custom smart object AI tasks with other functionality as well (such as further settings related to the movement or such if needed)